Our initial thoughts -
Yokomo RD 2.0 RTR

Our initial thoughts -
Yokomo RD 2.0 RTR
5/1/25, 5:00 PM
Our initial thoughts, taking it out of the box, are that the dampers are super squishy and seem like they’re going to provide excellent movement.
Our initial thoughts, taking it out of the box, are that the dampers are super squishy and seem like they’re going to provide excellent movement. The dampers that it comes with are not oil filled. We had a ready to run Yokomo that we converted to a rental car for the local track and it had the dry dampers which actually worked really well. It probably would be good to upgrade to the oil filled dampers; but for the time being these are fine. If you buy the builder kit, Rookie Drift 2.0, it WILL come with oil filled plastic dampers.
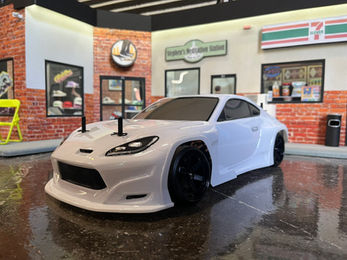
The body looks good and the body posts are a durable mounting system for learning on. Most drift cars use magnet mounts, but for learning, the posts are more secure.
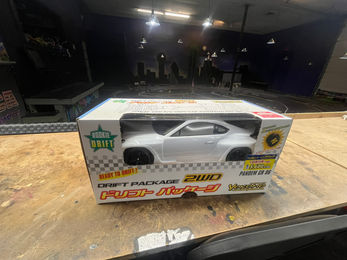
It’s kind of cool that it comes with some little cones and some actual drifting instructions even though they’re in Japanese. You can use Google Translate and take a picture of the instructions and it will translate them to English.
We went ahead and put the battery on the charger that it comes with to see how long it takes to charge up. Steve guessed 45 minutes, Ken estimated 3 hrs.
This is the brushed set up version and Ken thought it looked similar to what he started out with, “It’s that Chinese motor that’s made for a bunch of different companies, the same motor that comes with a lot of ready to run kits including crawlers.” He believed it was made by Hobbywing and said it looks like the HackMoto from Yeah racing. The gear mesh is good.
We checked out the initial setup from the factory and it looked like the front had 8° of camber. The rear was running one and a half degrees of camber. To our surprise, it looked like it was running about 1 degree of toe in up front. The initial set up had the Ackermann pretty parallel, visually it looks like 1° in. Having more Ackermann makes the car easier to drive for beginners but parallel is more precise. We drove it with the initial set up and saw how it performed and then made some changes to try to make it drive better. The initial ride height with the battery was 6.5mm front and rear. It comes with an 84 tooth spur and a 24 tooth pinion. Using the Final Drive Ratio chart for the normal Rookie Drift, that appeared to be a 9.1 FDR, which is a little on the fast side (which for drift is geared down) for current drifting, but acceptable and drivable. The battery took about an hour and a half to charge up completely. When the light turns red and green, it’s fully charged and the battery felt a little warm. The Electronic Speed Control (ESC) does have an option to switch to Lipo so you can upgrade the battery first thing if you’d like to.
Without making any changes, on the initial drive straight out of the box the car seems to steer a little bit to the left. This can be adjusted on the radio, but we decided to leave it for the time being. The gyro seemed to be too high, but the gain was only set at half. There was a little bit of a gyro wobble. We turned the gyro down a hair and that fixed the issue. It seemed to be driving more stable after that adjustment. The gyro seemed to be giving it input for full lock, but when we turned the wheel on the radio, it seemed to only be turning to half lock. We decided not to adjust any settings on the radio at first because once you change things on the radio there’s no way to tell what you changed. There’s no screen to display the settings or changes made, so once you start pushing buttons, there’s no way to tell where it is set.
It felt like there was not a lot of input from the steering and as if the exponential was turned way down or maybe the endpoints were not set correctly on the gyro. It is drivable and it’s something you could learn to drive on. The throttle input was a little bit punchy also. Maybe there was too much dead-band or some kind of coast setting that could be adjusted.
According to the manual you can turn up the end point of the steering:-
1. Turn the steering wheel (to the right) on the radio.
2. Push the far right button (R+) on the radio settings to increase the steering endpoint.
3. Repeat for the left side.
Then recalibrate the gyro:-
1. Hold down the button on the gyro while you turn the car on.
2. Turn the wheels to the right and push the button again.
3. Turn the wheels all the way to the left and push the button.
That will set the end points of the gyro to know what full lock is. Making these two adjustments on the radio and the gyro seemed to make a pretty big difference.
We were, in turn, able to increase the gyro gain and there’s no gyro wobble, so it was driving significantly better.
The throttle was still very punchy, but the gyro lock was good. Angel (Saya) was able to slide the car pretty well in tandem behind Joe as it was.
We moved forward with some other small upgrades. First was the battery. We switched the speed control to Lipo mode and installed a Lipo battery. In order to do this, we switched the connectors and soldered on a “Dean‘s” or “T-style” connector.
After switching to a Lipo Shorty pack, we found that the battery was lighter, raising up the rear. There is no way to adjust the dampers to lower the ride height, so we brought the upper mounting hole of the rear dampers in one slot and the adjustment lowered the back sufficiently.
We also gave the front 2 degrees of toe out overall which, in turn, gave it a little bit of Ackermann also. It seemed to be running pretty well after those changes. It’s definitely now a great chassis to learn to drift on and, if you want to get deeper into the hobby, you have a fully upgradable Yokomo RD2 chassis to work with.
When you buy any ready to run kit, you will get everything you need to get it going, but it’s not going to have top end electronics. Unfortunately in RC drifting, high-end electronics make a huge difference. Considering what the cost of the electronics is, the Yokomo Drift Package is a solid set up to get you on the track and learning how to drive.
Full disclosure: we’ve seen a lot of ready-to-run kits, and this is one of the best we’d recommend. While you’ll still need to upgrade the electronics — which is expected — once you do, you’ll have a solid rookie drift chassis. It’s based on the YD2 design, one of the most popular and proven RC drift platforms, with more parts, upgrades, and mods available than any other. Overall, it’s an excellent starting point.
We will be upgrading this build in future product reviews, so keep an eye out for it in the future!


